Getting Started with Electronics and the Arduino
If you are here I guess you’re craving to learn how to build a killer robot or control your stuff from anywhere. You’re not? Well, at least I will do my best to explain how to start your Arduino based electronic project.
##Introduction
You may already know some things about electronics. Either because you heard of it at school a while ago and you have a good memory or because you already discovered all of that by yourself. I remember very well my first electronic experience: connecting a light bulb to a 4.5V battery in my first science course.
What we call an electronic circuit is basically a loop between the two terminals of a power source. If basic implementations are quite easy, what’s more challenging is to build a more complex logic. And that’s where the Arduino board comes handy.
It’s in 2005 that the first Arduino board was introduced. They had been designed to provide a cheap and easy way for people to interact with their environment. Arduino also developed a software to program the boards, the Arduino IDE. Don’t worry if you never wrote a line of code, you should understand the basics quite easily.
There is now a large range of models when it comes to choose a board. Some are small, some are larger, some are more powerful, or provide more options. And over that, as all the hardware and code is open source, other manufacturers can build their own (often called Arduino clones / Arduino compatible boards).
Rather than making a course out of this blog post, this is going to be an overview on how to start your project, with the basics of programming and electronics, along with examples and tips from my experience.
I will also include useful resources in the post and also in the FAQ section where you can find answers to the questions you could ask yourself at this point of your discoveries.
##Learn with an example
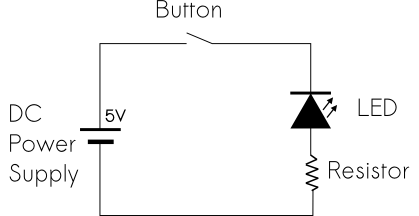
This simple scheme represents a circuit in which a LED will be turned on when we push the button. The other little component we can see aside the lamp is a resistor. We need it to prevent the LED to be overpowered. Tools will help you to calculate the resistor value according to its forward current and the source voltage, like this one or this one. According to the voltage of your circuit you’ll have a panel of options to power it like batteries, a transformer or even a usb port if you work with 5V.
Let’s talk about prototyping. You may have our wasn’t too acquire some electronics components: LEDs, resistors, various sensors for example. But how do you plan on connecting them? Don’t bring an ironing station yet. When we’re starting to build our project we really just want to proceed as easily as possible. Most people, me included, uses prototyping tools: jumper cables and breadboards.
Going further: Tips on how to prototype your electronic project
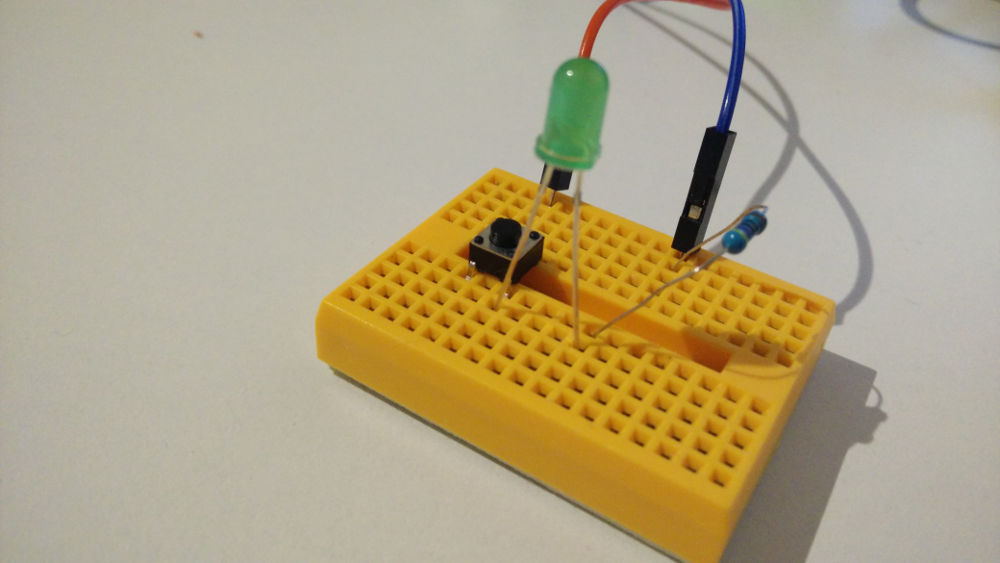
I brought the circuit we designed in the beginning to life and that’s what it looks like so far:
Let’s bring an Arduino into the game!
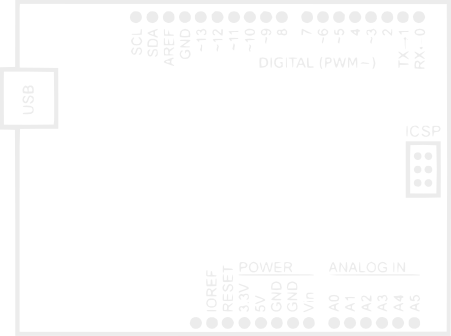
On each Arduino board, we find pins, that can either be used as inputs or outputs. Now I’m going to replace the button by an Arduino output. Because after all, like our button, a digital output of the Arduino is just a switch, something that either let the electric signal pass or not. To do that I connect one of the wires to the ground of the Arduino, and the other to the output pin of my choice. I chose the 13th.
The Arduino IDE comes with a handful of examples, one of them is called blink. All it will do is make our LED blink, infinitely.
Don’t get scared if you don’t understand these lines right away, I’m going to explain them step by step.
I chose the thirteenth pin because it’s the one used in this sample code that come along with the IDE. This pin is also special because most Arduino boards come with a testing LED on this specific pin, so we could see the result of our program without even doing anything. But hey, after all we’re here to learn!
/*
  Blink
  Turns on an LED on for one second, then off for one second, repeatedly.

  This example code is in the public domain.
 */

// give a name to the pin
int led = 13;

// the setup routine runs once when you press reset:
void setup() {
  // initialize the digital pin as an output.
  pinMode(led, OUTPUT);
}

// the loop routine runs over and over again forever:
void loop() {
  digitalWrite(led, HIGH);   // turn the LED on (HIGH is the voltage level)
  delay(1000);               // wait for a second
  digitalWrite(led, LOW);    // turn the LED off by making the voltage LOW
  delay(1000);               // wait for a second
}
If you never saw or wrote a piece of code, know that the language we use on the Arduino is a mix of C and C++. Everything between /* and */ and after // are only for comment purposes, so it could work without it but it’s a good habit to take to document your work.
As you can see we have 2 functions, called setup() and loop(). These are the two things you HAVE to put in any Arduino code you’re going to write.
The code in the first one will be called only once, at the beginning (and each time you reset or start the Arduino after that of course). So that’s where we are telling the Arduino we want to use pins as outputs or inputs.
pinMode(led, OUTPUT); // This initializes the pin 13 as an output (that we defined as an integer variable ‘led’ at the top of the code)The loop() function is where you will put all the logic. It will be executed again and again, as long as you’re Arduino is plugged in. So in this example, the behavior we want is to turn the light on, then off, then on, then off… you notice the loop right? But that’s not quite it, as you can see in the code above, we have to add a sleeping time between, because otherwise the delay between the actions would be defined by the processing speed of the Arduino, and in you would not even notice the LED blinking.
Just to recap:
- pinMode(pin, OUTPUT) or pinMode(pin, INPUT) are used to initialize the pin we want to use
- digitalWrite(pin, HIGH) or digitalWrite(pin, LOW) is used to set the state of an output
And we have not used it here, but if we had used a pin as a digital Input, to get its value we use digitalRead(pin).
##Going further with programming
If this example is a good one to learn how the code is processed, it hardly get anything done. I want to show you some code example with a bit more complex logic.

If you are not familiar with programming, these few next tips are for you.
###Types and variables
As showed in the first code sample, it is possible to name the by declaring what is called a variable and assigning it the number of the pin. But you can really use these to store anything.
To declare a variable: type name = value;
Once declared, you just have to put its name in your code, to either get its value or change it.
Based on the type of data you want to store in the memory, you will have to define its type when declaring it :
int
A signed integer (positive or negative), for example the number of your pin. You can make comparisons on them, I will talk about those below.
char*
This is to store text, the star(*) actually tell the program that it is an array of characters. You have to put text strings between quotes.
boolean
A boolean is a variable that can only have to states: true or false. To check its value in your conditions, you just have to use if(name) to validate the fact that the boolean value is true or if(!name) to check if it is not.
###Conditions
Sometimes you may want to execute a part of your code only in specific circumstances. To do this we use an if statement.
// checks if the voltage on the pin named ‘switch’ is HIGH
if(digitalRead(switch) == HIGH) {
    // some code
}

// checks if the value of ‘weather’ is not “sunny”
char* weather = “sunny”; // that’s how you define a string of characters
if(weather != “sunny”) {
  // some code
}
There are other comparison possible:
- == to check equality
- != to check non equality
- < to check inferiority
- > to check superiority
- <= to check inferiority or equality
- >= to check superiority or equality
Combining conditions
It is possible to check multiple things in one if() statement. In order to do that we use special operators: && to make an AND association, the comparaison at both side of it have to be true to validate the condition. The other one is || (double pipes), it is used to make an OR statement: at least one of the two parts have to be true. Examples: if(number > 5 && ok): to validate the condition, the variable named number have to be greater than 5 AND the boolean ok must be true if(number <= 100 || !ok): to validate the condition, the variable named number have to be strictly lower than 100 OR the boolean ok must be false
###Loops
When programming, loops are used to repeat a sample of code as long as conditions are met.
As in the Arduino loop() we are in an infinite loop, it may look strange to add more loops into that, and often simple conditions will be enough to define your logic. Let’s take an example: you want the program to do nothing as long as the state of a pin is LOW.
while(digitalRead(pin), LOW)
{
	sleep();
}
Another way to do that is with the for loops. We use them like that: for(code executed at the beginning ; condition to met ; code executed each time) { }. That means that the code inside, as well as the third part of the statement will be executed each times as long as the condition is met.
for(int count = 0; count < 10; count++)
{
	// some code
// at each iteration, count value is increased by 1
}
###Functions
To avoid writing multiple times the same code, we can use functions. Remember, setup() and loop() are functions for example. So you can just define your own, and then use them from anywhere in the file. Each one can accept parameters and return a value (optional).
Here is a little example:
/* some_file */

int nbPins = 13;
int currentPin = 1;

/*
  Return the next pin
  params:
  int currentPin
  int nbPins
  return int
 */
function nextPin(int currentPin, int nbPins)
{
  var result = 1; // initiate the result to the first pin

  // we check that we are not out of range
  if(currentPin + 1) <= nbPins) {
  	var result = currentPin + 1; // it’s ok, we can increase the value of the pin and set it as the result
  }

  return result; // return the result
}

/* … */

function loop()
{
  /* … */
  digitalWrite(currentPin, HIGH);
  currentPin = nextPin(currentPin, nbPins);
  /* … */
}
##Going further with electronics
We talked about input and outputs, let’s review some examples of components we can use in our projects.
###Digital inputs
Button, switches: A button will let the electricity pass when pressed, when a switch will keep physically its current state. This means that when you want to do something when a button is pressed, you’ll have to memorize the information in your code.
Sensors: Some sensors acts like a switch. They will either let the electricity pass or not. Example: a reed sensor, activated when there is a strong enough magnetic field near it
###Digital output
Relay: You can use a pin of the Arduino to trigger a relay to command another electric circuit. You will often use this when you want to power something with higher voltage or that needs more current. See also How much current can I draw from the Arduino pins?
LEDs: White, Colored, Infrared, RGB, 3mm, 5mm… There’s a bunch of LEDs out there, you can of course use some to light a room but it’s mostly useful to get informations (change the color of an RGB LED to know what’s happening in your app, use an infrared LED to communicate…).
7 segment displays: Going further, there are also displays composed of LEDs, the 7 segment displays for example. Of course for these one you will need more than one pin. It can quickly take a lot of inputs, but there are a way to use less inputs to control them, it’s called Multiplexing. But I will talk about this one soon in a video!
LCD Displays: The most used with arduino probably being the Hitachi 44780. Once connected properly, you will use the arduino dedicated library to control its brightness, and what’s written on each lines!
Buzzer: When the lights are not annoying enough, use sounds!
###Analog inputs
More buttons: It is possible to connect multiple buttons using only one analog input, by putting them in parallel, with a resistor between each button. After that, you just have to analyze the value you get when one of the button is pressed and you’ll know in your program which one it was.
Photoresistor: A photoresistor is a resistor whose value changes depending on the brightness. By using an analog input you will get in your program a value reflecting the brightness of your environment. I plan on making a video soon explaining how you can take advantages of this one, using it as a motion detector for example.
Infrared receiver: I talked about infrared LEDs, well, if you want to use the signal yourself, use an Infrared receiver to get the data.
Other sensors: Microphone, temperature, humidity, gas sensors… Beware, it is most of the time simpler and can be cheaper to buy directly a module for these sensors, rather than using just the main component and associate it with the electronics it needs to be used on an arduino input.
###Analog outputs
The analog outputs are actually the digital pins with the sign PWM (sometimes # or ~). The Pulse Width Modulation (PWM) creates a signal that simulate voltages in between full on (5V) and off (0V). You can set the value with the method analogWrite.
DC Motors: You can command (not power! use an external power source) a DC motor with an pin of the arduino. Using the pwm pins allow you to vary its speed.
Servomotors: This is also a kind of motor, but rather than controlling its speed, you can control precisely its rotation angle. Often used in robotics, I’m sure you’ll find something fun to do with this one. Here again, use an external power source!
LEDs: And here we are again with LEDs! Indeed, you can control their brightness using the PWM pins.
###Modules and shields
SD Card: Store and retrieve informations by adding storage to your Arduino board!
Ethernet: Add the ability to your Arduino to connect to the Internet. There are shields out there with this module on it that you just have to plug above your arduino. If you are looking for a cheaper and more flexible solution, just use directly an ethernet controller. I use the enc28j60.
Wifi: Connect your board to the Internet wirelessly!
GSM: There are options out there to transform your Arduino into a phone! Send and receive SMS, calls, use mobile data networks…. The possibilities are wide with this one, but it does not come cheap. Not only you will spend tens of dollars for the shield, but you’ll need a mobile plan and a sim card.
##What to do now?
Now that you have all the knowledge and electronic components, you may still ask yourself what you can build with all this.
###You already got your idea
Maybe you came here because you already had your project and just needed more informations on the Arduino environment. As I said in the introduction, this post is not a course, but if you still have questions, check out the FAQ at the bottom of this page. If you still have something to ask me, feel free to contact me or leave a comment.
###You don’t but still want to do something
You are still wondering what you can do with all of this? I still suggest you begin to practise right now! By experimenting, you will quickly see if you like what you’re doing and you may get inspiration out of it.
You could also start with a kit. These are bulks of components designed for those who are looking to expand their inventory or seek to discover.
###What does it take?
So, what does it take to get something done in electronics? We could be tempted to answer money, but really, money should not be a problem. Electronics components are overall really cheap. It is sure that if you want the official Arduino kit, and all their shields, it can be seen as a relatively large investment. If you’re like me, just buy what you need when you need it.
I buy everything directly from China on eBay. Why? Because wherever you will buy the equipment, it has to be made in China, also because it is really cheap (Between $4 and $15 for arduino boards, under $1 for mosts sensors, a few bucks for modules like ethernet / wifi for examples). The downside is that it will take 2 to 4 weeks to ship.
So money aside, all it really takes is time and motivation.
Florian
##FAQ
(Coming soon)